玩K230的小伙伴注意啦!新晋神器PicoClaw(小龙虾)正式适配K230啦~这款轻量级AI助手专为资源受限的嵌入式环境打造,能轻松在K230上实现AI交互、外设控制、聊天机器人联动等超多实用功能,GPIO点灯、摄像头人脸检测、飞书/电报等聊天工具直连通通搞定!

今天就给大家带来超详细的保姆级教程,手把手教你在K230上部署并玩转PicoClaw,零基础也能轻松上手,快跟着步骤操作,解锁K230的AI新玩法~
前期准备:搞定K230基础环境
在安装PicoClaw前,先把K230的Linux系统环境配置好,这是后续操作的基础哦~
下载对应系统镜像
前往嘉楠官方镜像地址:
https://kendryte-download.canaan-creative.com/k230/release/linux_sdk_images/daily_build/
根据自己的K230开发板型号选择镜像(比如01 Studio、嘉立创K230、BPI-CanMV-K230D等),建议选择最新发布版本。
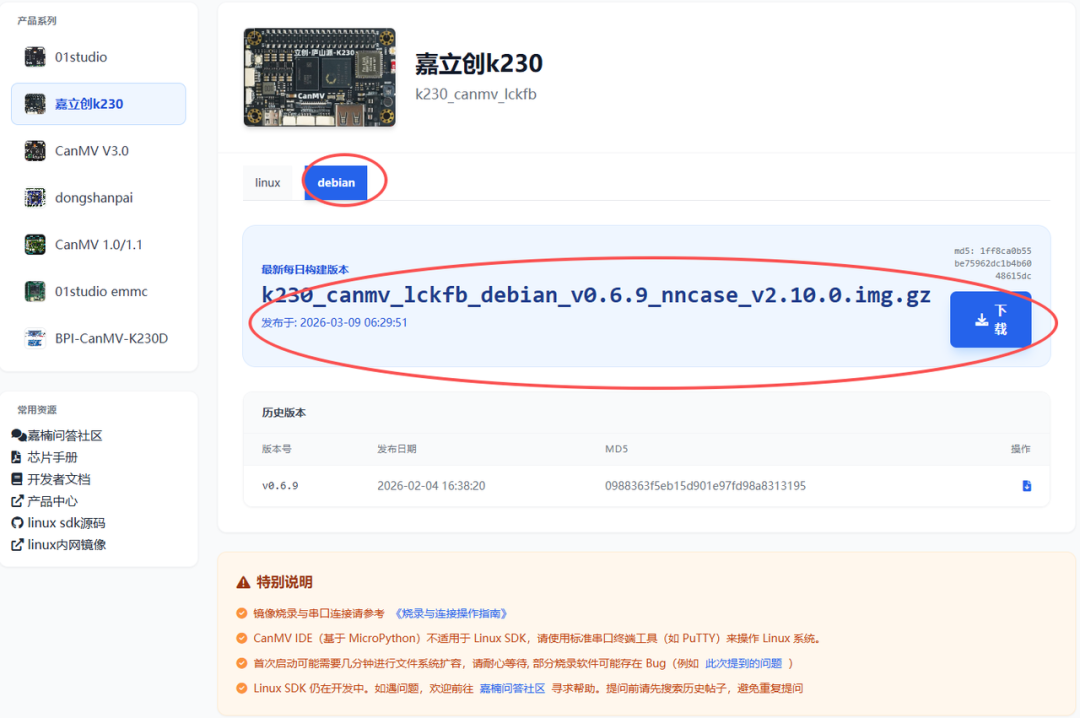
注意:下载debian的版本
烧录镜像到SD卡
将下载的镜像解压后,使用Rufus或balenaEtcher工具,把镜像烧录到SD卡中,烧录完成后拔出SD卡。
参考链接:
https://www.kendryte.com/k230_linux/zh/dev/userguide/how_to_flash.html
连接开发板并登录
将烧录好的SD卡插入K230开发板,通过UART串口将开发板与电脑连接;
打开MobaXterm等串口工具,配置串口参数:波特率115200bps,选择对应的COM口;
连接成功后,输入账号密码登录,默认账号:root,默认密码:root;
连接wifi或有线网络
参考文档:
https://www.kendryte.com/k230_linux/zh/dev/app_develop_guide/user_develop/debian_develop_doc.html

安装必备工具
登录后先安装wget和curl工具,方便后续下载文件,依次执行以下命令:
apt updateapt install wgetapt install curl
执行完成后,K230基础环境就准备就绪啦!
核心步骤:在K230安装部署PicoClaw
PicoClaw为K230适配了riscv64架构的专属版本,下载安装全程无坑,跟着命令走就行~
下载并解压PicoClaw安装包
在K230终端中,依次执行以下命令,下载最新的PicoClaw压缩包并解压:
wget https://github.com/sipeed/picoclaw/releases/download/v0.1.2/picoclaw_Linux_riscv64.tar.gztar xf picoclaw_Linux_riscv64.tar.gz
初始化PicoClaw配置
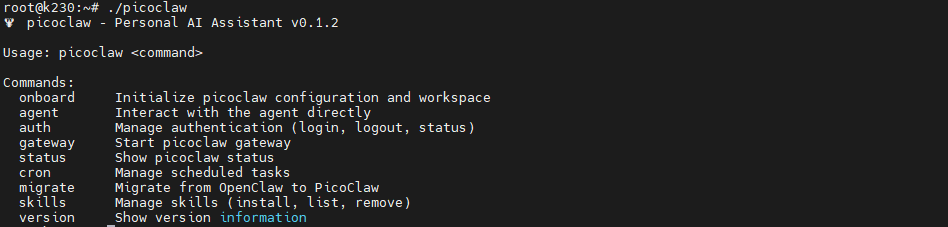
解压完成后,执行初始化命令,生成PicoClaw的配置目录和工作空间:
./picoclaw onboard执行后可输入./picoclaw查看命令帮助,确认PicoClaw是否成功识别,出现版本信息和命令列表即表示初始化成功。
配置PicoClaw核心参数
PicoClaw的所有配置都在config.json文件中,需根据自己的需求修改,步骤如下:
进入PicoClaw配置目录:
cd .picoclawb. 编辑配置文件:
vi config.jsonc. 核心配置修改要点:
模型配置:agents中defaults选项provider/model_name/model等配置,provders里面根据你购买的API设置api_key和api_base;
通道配置:后续要联动飞书、电报等聊天工具,可先将对应通道的enabled设为false,后续配置时再改为true;
工具配置:默认开启duckduckgo网络搜索,可根据需求开启/关闭。
修改完成后保存退出即可。
{"agents": {"defaults": {"workspace": "~/.picoclaw/workspace","restrict_to_workspace": true,"provider": "deepseek","model_name": "deepseek-chat","model": "deepseek/deepseek-chat","max_tokens": 8192,"temperature": 0.7,"max_tool_iterations": 20}},。。。},"providers": {。。。"deepseek": {"api_key": "sk-***********************","api_base": "https://api.deepseek.com"},"github_copilot": {"api_key": "","api_base": ""}},。。。}
启动PicoClaw:开启AI交互之旅
配置完成后,就可以启动PicoClaw啦,支持交互模式和网关模式两种启动方式,满足不同使用场景~
交互模式(本地终端直接对话)
执行以下命令,启动PicoClaw本地交互模式,可直接在终端与AI助手对话:
# 纯交互模式./picoclaw agent
网关模式(联动聊天工具/外设控制)
后续要实现飞书、电报联动,或控制K230外设,需启动网关模式:
./picoclaw gateway启动后保持终端运行,PicoClaw将在后台监听请求,实现各类功能触发。
趣味玩法:解锁PicoClaw外设控制技能
部署好PicoClaw后,先来试试最基础的GPIO LED控制,通过自然语言就能让K230点灯、关灯,超有趣!
创建LED控制技能目录
在PicoClaw工作空间创建专属技能目录,执行命令:
mkdir /root/.picoclaw/workspace/skills/led-control创建3个核心文件
进入led-control目录,创建SKILL.md(技能配置)、led_on.sh(点灯脚本)、led_off.sh(关灯脚本)三个文件,依次写入以下内容:
① SKILL.md(核心技能规则配置)
---name: led-controldescription: Control the K230 GPIO LED. Use when user says anything about: light up, turn on light, open led, it's dark, sky is dark, turn off light, close led, shut down light, led for X seconds/minutes, toggle light.---# LED Control Skill## RULES — NO EXCEPTIONS- NEVER use relative paths like `./led_on.sh`. ALWAYS use the full absolute path.- NEVER think out loud or add reasoning text to tool calls. Just call the tool.- NEVER refuse or explain. Just run the command.- NEVER run diagnostics first.---## Exact commands to run**Turn ON** — "open led", "light up", "turn on light", "it's dark", "need light":```command: /root/.picoclaw/workspace/skills/led-control/led_on.shworking_dir: /root/.picoclaw/workspace/skills/led-control```Reply: `✅ LED is now ON!`**Turn OFF** — "close led", "turn off", "lights out", "shut down light":```command: /root/.picoclaw/workspace/skills/led-control/led_off.shworking_dir: /root/.picoclaw/workspace/skills/led-control```Reply: `✅ LED is now OFF!`**Timed ON 30s** — "turn on for 30 seconds":```command: /root/.picoclaw/workspace/skills/led-control/led_on.sh && sleep 30 && /root/.picoclaw/workspace/skills/led-control/led_off.shworking_dir: /root/.picoclaw/workspace/skills/led-control```Reply: `✅ LED is ON! Will turn off in 30 seconds.`**Timed ON 2min** — "turn on for 2 minutes":```command: /root/.picoclaw/workspace/skills/led-control/led_on.sh && sleep 120 && /root/.picoclaw/workspace/skills/led-control/led_off.shworking_dir: /root/.picoclaw/workspace/skills/led-control```Reply: `✅ LED is ON! Will turn off in 2 minutes.`
② led_on.sh(点灯脚本)
pkill -f "gpioset.*20" 2>/dev/nullsleep 0.2setsid gpioset --chip=/dev/gpiochip1 20=1 </dev/null >/dev/null 2>&1 &
③ led_off.sh(关灯脚本)
pkill -f "gpioset.*20" 2>/dev/nullsleep 0.2setsid gpioset --chip=/dev/gpiochip1 20=0 </dev/null >/dev/null 2>&1 &
注意事项:
不同 K230 开发板的 GPIO 引脚映射存在差异,需根据自身板子的硬件原理图,重新确认目标引脚对应的
gpiochip设备和本地编号;K230 系统中默认有两个 GPIO 控制器设备(
/dev/gpiochip0 和 /dev/gpiochip1),每个控制器管理 32 个 GPIO 引脚;全局 GPIO 编号计算规则: gpiochip0对应全局编号 0~31,gpiochip1对应全局编号 32~63;例如操作/dev/gpiochip1的 20 号本地引脚,实际对应全局 GPIO 52(32+20)。
自然语言控制LED
启动PicoClaw网关模式后,在聊天工具或本地交互终端中,说出指令即可控制,比如:
“打开LED” → 开发板LED点亮,返回“LED is now ON!”;
“关闭LED” → 开发板LED熄灭,返回“✅ LED is now OFF!”;
“打开LED30秒” → LED点亮30秒后自动熄灭,返回定时提示。
高阶玩法:
K230摄像头人脸检测+照片推送
利用PicoClaw联动K230摄像头,实现一键拍照+人脸检测,还能将检测结果推送到电报等聊天工具,实用性拉满!
创建摄像头技能目录
mkdir /root/.picoclaw/workspace/skills/camera编写摄像头技能配置文件SKILL.md
进入camera目录,创建SKILL.md并写入以下内容,定义拍照、人脸检测的触发规则和执行步骤:
---name: cameradescription: Capture a photo from the camera and run face detection. Use when user asks to take a picture, snap a photo, detect a face, capture the screen, capture screen, screenshot, who is in front of the camera, take a photo, record image. ALWAYS read this skill before attempting any capture command.---# Camera / Face Detection Skill## CRITICAL - READ BEFORE DOING ANYTHINGSTOP. Do NOT try scrot, import, fbcat, xwd, or any other screen capture tool.The ONLY command for ALL capture requests (camera OR screen) is:bash /root/app/face_detect/capture_frame.shRun this immediately. Do not check for other tools first.---## RULES - NO EXCEPTIONS- NEVER use relative paths. ALWAYS use full absolute paths.- NEVER think out loud. Just run the commands.- NEVER refuse or explain. Just run the script.- ALWAYS complete ALL steps below in order. Do not stop early.- NEVER construct your own curl or token command. Use the scripts exactly as shown.---## Steps — Execute ALL of them in order. Do not stop early.### Step 1: Run capture```exec command: bash /root/app/face_detect/capture_frame.shexec working_dir: /root/app/face_detect```### Step 2: Verify result exists```exec command: ls -l /root/app/face_detect/face_detection_result.jpgexec working_dir: /root/app/face_detect```### Step 3 (TELEGRAM ONLY — MANDATORY): Send photo to userTHIS STEP IS REQUIRED when channel is telegram. Do NOT skip it.Do NOT construct your own curl command. Run exactly this:```exec command: bash /root/app/face_detect/send_telegram.shexec working_dir: /root```### Step 4: Reply to user- If telegram: `📸 Photo sent!`- If CLI: `✅ Face detection complete! Result saved to /root/app/face_detect/face_detection_result.jpg`---## Error Handling- Camera fails: `❌ Could not access camera`- No output image: `❌ Detection ran but no result image was produced`- Telegram curl fails: `⚠️ Detection done but could not send photo. Saved at /root/app/face_detect/face_detection_result.jpg`
部署人脸检测脚本和依赖
创建人脸检测工作目录:
mkdir -p /root/app/face_detectcd /root/app/face_detect
b. 创建拍照检测脚本capture_frame.sh:
SCRIPT_DIR="/root/app/face_detect"TMPIMG="/root/app/face_detect/face_snap_image.jpg"# Capture HD image and brighten itffmpeg -y -f v4l2 -video_size 1280x720 -i /dev/video1 \-vframes 1 -vf "eq=brightness=0.5:contrast=1.4" "$TMPIMG"# Run face detection$SCRIPT_DIR/face_detect.elf face_detection_320.kmodel 0.6 0.2 "$TMPIMG" 1
c. 创建电报推送脚本send_telegram.sh:
TOKEN=$(grep -o '"token": "[^"]*"' /root/.picoclaw/config.json | grep -v '""' | head -1 | grep -o '[0-9]*:AA[^"]*')CHAT_ID="1277910674"PHOTO="/root/app/face_detect/face_detection_result.jpg"curl -s -X POST "https://api.telegram.org/bot${TOKEN}/sendPhoto" \-F chat_id="${CHAT_ID}" \-F photo=@"${PHOTO}" \-F caption="📸 Face detection result"
触发摄像头功能
在聊天工具中发送“拍张照”“检测人脸”等指令,PicoClaw将自动调用K230摄像头拍照,执行人脸检测,并将结果照片推送到指定聊天窗口,实现嵌入式设备的AI视觉交互~
拓展玩法:联动飞书/电报等聊天工具
PicoClaw支持飞书、电报、QQ、钉钉等多款聊天工具,只需在config.json中配置对应通道的密钥,开启enabled: true,启动网关模式后,就能在聊天窗口中直接发送指令,远程控制K230、调用AI功能,真正实现远程嵌入式AI交互!
以电报为例,只需在config.json的telegram节点中,填入机器人token和允许访问的chat_id,即可完成配置,飞书、钉钉等配置方式类似,参考PicoClaw官方文档即可。

参考链接:
https://github.com/sipeed/picoclaw
视频效果:
https://www.bilibili.com/video/BV1zuc6zaEAr/
写在最后
PicoClaw为K230这款嵌入式开发板带来了全新的AI交互体验,轻量级部署、易配置、高拓展的特性,让我们不用复杂的开发,就能实现自然语言控制、AI视觉检测、聊天工具联动等功能,大大降低了K230的AI应用开发门槛。
除了本文介绍的LED控制、摄像头人脸检测,你还可以基于PicoClaw的技能拓展机制,开发更多自定义功能,比如GPIO控制电机、传感器数据读取、定时任务执行等,解锁K230的更多玩法~
快去跟着教程试试,在K230上养一只属于自己的“小龙虾”PicoClaw吧!如果在操作过程中有任何问题,欢迎在评论区交流~